Wednesday, January 26, 2011

Year of the Rabbit Sewing Kit

 
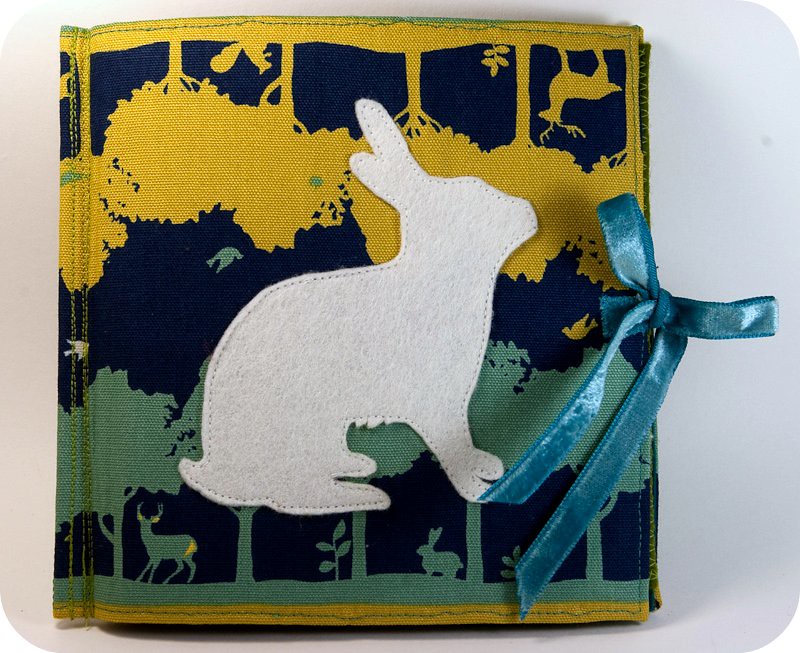
Have you heard 2011 is the Year of the Rabbit? That sounds good to me; rabbits have always been associated with luck, so I hope this will be a lucky year. Rabbits are also symbols of the coming spring, and I am pretty sick of blah winter rains and no sunshine.

I wanted to make a little "extra present" for my sister, who just had a birthday, but has been studying hard and deserves a little extra something just for being herself. As she and I both have a fondness for cute little woodland animals, I decided to make her gift rabbit-themed, to go with the new year, and lucky, sunny wishes. I made her a cute little sewing kit, including a needle book, a white rabbit measuring tape, and a little needle felted rabbit teacup pincushion. 
 
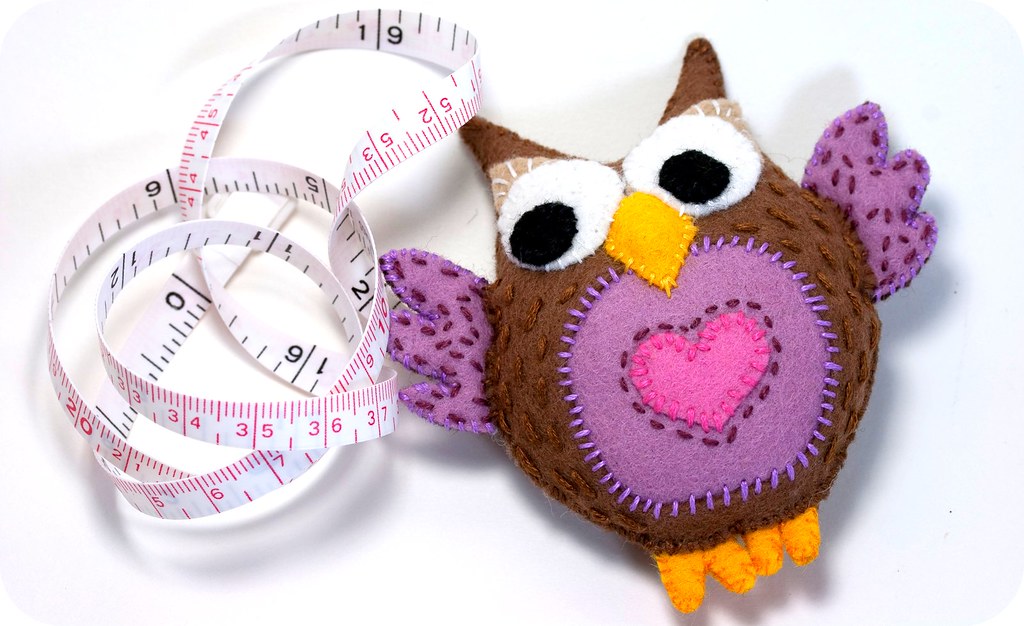
The tail of the white rabbit measuring tape is a ball of needle felted cream wool, which also serves as the pull tab for the measuring tape. I used a tiny shell button in the center of the rabbit to trigger the mechanism for retracting the tape. I decided to keep the design simple and not include any details in the rabbit except for a green eye. The rabbit body was made in much the same way as my owl tape measure.
The needle book is 6" square, with one center page. I fused Timtex between the layers of fabric and felt to make the books cover very rigid (more "book-like" than most fabric books). On the inside, I used little panels of felt to separate each type of needle. There are also some pockets for holding sewing machine needles, a needle threader, and a pair of Japanese thread snips. I found a little piece of vintage velvet ribbon use as the tie. For the heavy needles, I sewed down two rows of a Japanese crochet cotton lace I purchased from Daiso in Vancouver; the larger needles can thread easily through the holes in the lace.

Here is the inside of the needle book: 
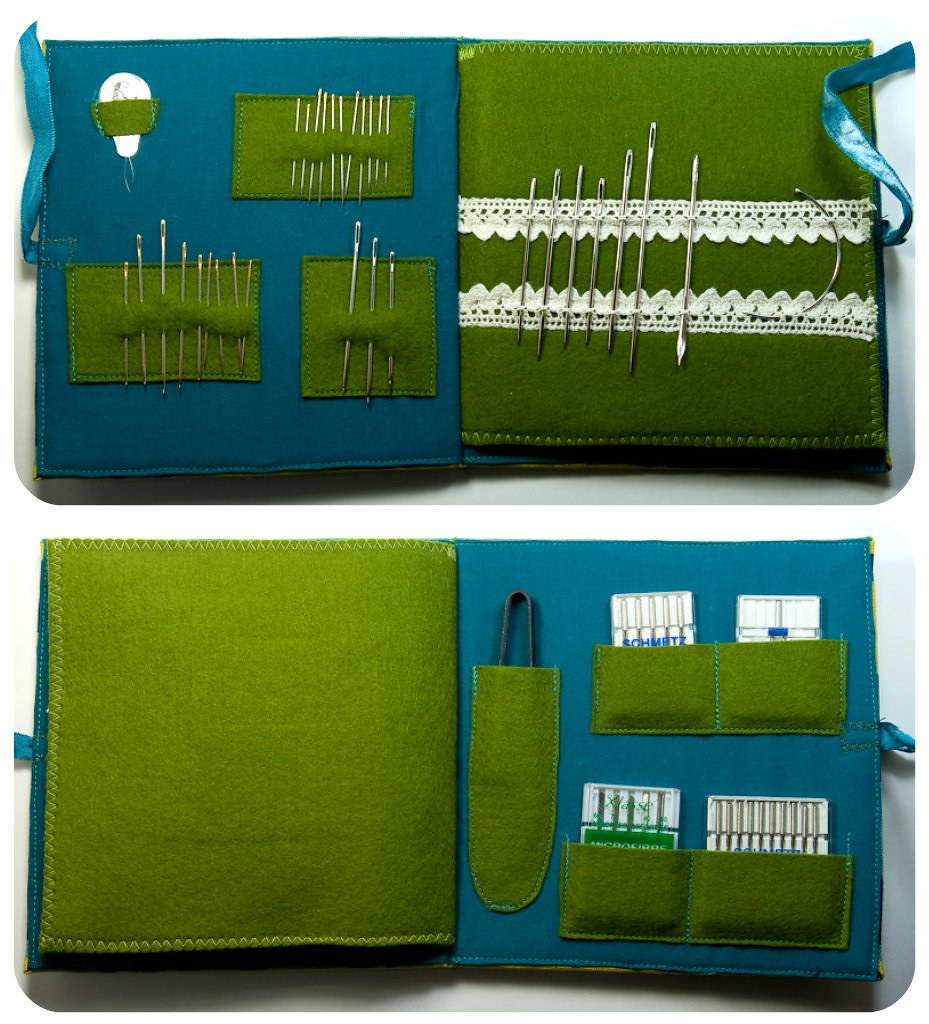
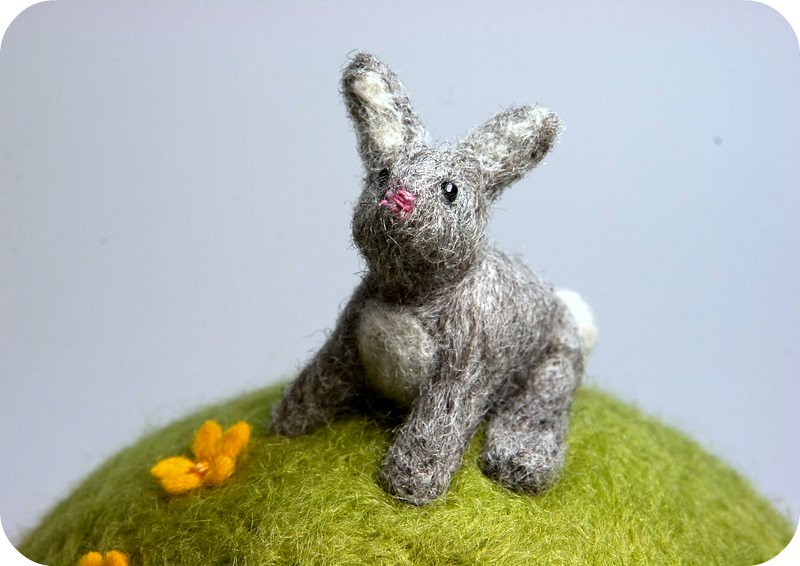
The pin cushion was the most fun of the three little projects to make. I really love needle felting. It feels like magic crafting. Before I tried it, I didn't know what all the fuss was about, but now it is my favourite thing to do late at night. My rabbit is made of grey and white felt wool, his eyes are black seed beads and his nose is a few stitches with pink embroidery thread.  I really like the expression on the little grey bunny. He looks like he was disturbed from his lunch of felt buttercups by a nosey crafter, and he is just waiting for me to look away so he can go about his business.

There are a lot of other teacup pincushions out there. The first time I saw the beautiful little worlds in a teacup made by Mimi Kirchner, I knew I wanted to try to make one. My teacup is like a very simple version of the beautiful scenes she creates.

Happy Chinese New Year!

Monday, January 17, 2011

Green Felt Bird

 
I really love birds. I think this came from my Mom, who took me on a lot of nature walks as a kid, made beautiful feeders and birdhouses for our yard and always took the time to point out the different species we saw and how she identified each one. She is also a very talented artist and carver, and filled our home with gorgeous, and sometimes quirky, wooden birds.

Lately, I have found a lot of other crafty and artistic people who find inspiration in the beautiful shapes and colours of birds. One such person is Geninne, from Geninne's Art Blog, who paints the most stunning and vivid watercolours. Her work is very modern, filled with colour, and every time I visit her blog I feel inspired to get out my paints and practice. If you haven't already stumbled on her, I highly recommend taking a look.

Another blogger whose love of birds inspires me is Abigail Patner Glassenberg, from While She Naps. Abigail is the author of The Artful Bird, a book filled with projects for sewing amazing birds from all sorts of different materials. My little green bird was created using a pattern from this book for a wren. It is made of hand-sewn wool felt, with needle felted and embroidered details, and legs made from craft wire. I really love how it stands on its own two feet! The colours I chose, the bright chartreuse and emerald green, were inspired by the fearless use of colour in Geninne's paintings.
This little bird is for you Mom!

Sewing the Negroni Shirt with Male Pattern Boldness


Is it possible that I have just bitten off more than I can chew? I just retrieved my sewing machine from the repair shop and I am feeling over ambitious? Maybe I am crazy? This is violating all the Craft Book Challenge ethic that I have been striving towards, but I just ordered the Negroni pattern from Collette so that I can participate in a Sew-Along!

Never mind that I have never sewn menswear before. Let alone anything with a collar. Or a sleeve placket. Or that when I picked up my sewing machine I had to ask them to show me how the button hole foot works because I have had my machine for almost 4 years and have never once used it. 

Perhaps crazy doesn't do me justice, maybe I am insane.

But I have faith in Peter over at Male Pattern Boldness. He has been making some really terrific clothing for himself and his partner and he only started sewing in 2009! I have been sewing since I was a teenager, so I should be OK, right? Right?

The Negroni pattern looks really retro-cool and the relaxed fit of the collar appeals to me. I think it is time I expand my sewing horizons beyond bags and accessories and very simple clothing, so I guess I'm sewing a hipster shirt for the other person living in the Tiny Apartment! The Sew-Along with MPB starts February 1st, making this project my Valentine's Day Plan. I sure hope the pattern arrives in time!

Psst! there's a promotional code for participants of the MPB Sew-Along that gets you a discount on the Negroni pattern at Collette; click the button in my sidebar if you are interested.

What are you working on for your sweet Valentine? Are you like me, attempting something huge and difficult? Are you more sensible and normal and you make heart cookies or bring them their coffee in bed that day? Is it a secret? I personally like surprises, but I have to measure him pretty extensively for this, so I think he's going to figure it out. He's all smart like that.

Also, have any of you had any experience with Collette patterns? Or attempted a mens button-down shirt? How did that go?

Friday, January 14, 2011

First Craft Book Challenge Project: Palm-Size Softies

As I was going through my craft books at the start of this challenge I found an alarming number of knitting and crochet books bought when I first tried learning to knit and was convinced I was going to be amazing at it. Turns out not so much. So this year it looks like I am going to have to try my hand at knitting and crochet again in order to keep this challenge going! But for now, I am going to stick with what I love, and what I really love at the moment is sewing things out of felt. I made this tiny little red fox as my first project in the Craft Book Challenge.  

Palm-Size Softies, by Hitomi Takahashi, Mikiko Matsui and Akemi Tsubo, is actually my newest craft book, purchased just before Christmas as a little present to myself. The projects in here are so adorable, I will probably be making most of them. Below is a picture from the book of "Mimi", the pattern I used. She is actually a pet for one of the other softies in the book, so she is really really tiny! I altered the tail a little bit, and added white patches to the ears and chest to make a little red fox instead of a little cat.
This pattern was my first time sewing a gusset into a stuffed animal but the book has great cartoon-like illustrations explaining each step and it was easy to figure out. Abigail over at While She Naps is writing a great series of tutorials on making soft toys and has just made a post all about gussets in soft toys. If you are interested in learning more about making or designing your own soft toys you should really check it out!

I have yet to name this little guy, but here he is, in all his various foxy poses: 
I think the scarf really adds that little je ne sais quoi. You can see just how small he really is when he stands beside some little spools of thread!
Are you participating in the Craft Book Challenge? It's not too late to make something for January! Click the button in my sidebar if you are interested in joining in on the fun.

Tuesday, January 11, 2011

Snow Day Vanilla Pudding


It's Snowing! And according to Deb over at Smitten Kitchen the best thing to do when it is snowing is make this homemade vanilla bean pudding. Never one to question an expert I made some immediately. She is right, this is so wonderful, and simple, and good, and comforting on a cold day, especially when you have a cold.

Underneath my little pot of pudding is some fabric that just arrived in the mail today! If you live in Canada you should really check out Omiyage. They carry all sorts of super cute Japanese craft supplies, fabric, washi tapes, stationary and other cute stuff, and they ship for just a 5$ flat rate. I bought 2 meters of this Kokka print in both the blue and purple colourway and I can't wait to cut into them! 

Felt Owl Measuring Tape + Free PDF Pattern

OK Internet, as promised, an owl craft made just for you! You can download a PDF pattern for this little Owl at the bottom of the page.

I have been stuck in bed this week, hit hard with the worst cold I think I have ever had. So if you want to try this at home, it is so easy it can be done under the covers, on a lap tray, while drinking tea and hunting for a good movie on Netflix. I just hope your partner doesn't mind little bits of felt and fluff in the bed!

I made this little owl out of some of my wool felt scraps and a tiny Japanese measuring tape which I had picked up ages ago at my favourite local fabric store, Gala Fabrics. Our little owl friend is hand sewn and embroidered with cotton embroidery threads, and stuffed, along with the measuring tape, with a little polyester fiberfill and some quilt batting. It is hard to see in the pictures, but the tape has a pull tab which comes out just behind the owls wing. If you don't have a tiny tape measure, you can still make a stuffy version or applique him onto any of your projects for some added cute.
The first step is to decide what colours you like for your owl and cut out all your felt pieces. This took my sick-addled brain a long time, but I finally I chose some of my favourite colours, a soft heather purple and pink with light browns. If you design your own felt animal for this project, notice in the photos below that you need to make the body at least a 1/4" bigger than your tape measure on all sides

Next, sew on the felt features and embroider the body of your owl. I used 3 strands of embroidery floss for most of the decorative stitches, 6 strands of brown for the owl body, and 2 strands to sew down the eyes and beak. I also used a little bit of stuffing in the beak to make it puffy. All my stitching is just simple straight stitches and overcast stitches. If you are not under the influence of a big mug of NeoCitran, you might want to attempt something fancier, but it's not really necessary (I had this idea to cover the back of the owl with lazy-daisy stitch "feathers", but that seemed too exhausting).

Decorate the front of each wing as you like and then sew the wing fronts and backs together with 2 strands thread, adding a little stuffing before closing them up. Stitch together the little toes. I used 1 strand of floss in a fine needle to make sewing the tiny little toes easier.
Cut out two pieces of cotton quilt batting a little smaller than your owl body. I used a little quilt baste spray (yeah, don't do that step in bed!) to attach the batting to the wrong side of each brown body piece. Position your measuring tape button side down, on the back side of your owl body, so that the tab comes out behind where a wing will be. I held the tape in place with a couple of basting stitches which I pulled out when the owl was finished.

I sewed the body together with overcast stitches, starting from the middle of the head and working my way around clockwise. Stuff as you go, both around the edges, and adding a little stuffing on top of the tape.

When you reach a spot to insert wings or feet, tuck them between the two body pieces and make sure your stitches catch all 3 layers as you sew. When you reach the tape measure tab, cut a little slit in the felt so that the tape can move freely (see picture above).

Keep sewing and stuffing until you reach the top of the head again, make a knot and then draw your thread through the owls body. Clip the thread close, the tail will be pulled back into the owls body. Pull out the basting stitches around the measuring tape from the back.
This little owl would be a great gift for a crafty friends sewing box, but a handy little measuring tape in your purse is really useful for thrifty shoppers too! I find carrying a measuring tape to garage sales and thrift stores helps me be sure that one of a kind finds will actually fit and be used in The Tiny Apartment and won't be a waste of money. I also carry a tiny notebook with the measurements of things I hope to find: the height of my chairs, the width of a shelf I could use, yardage for sewing projects, the diameter of the Pyrex lid I am missing, etc...
  
Download the PDF pattern here

Tuesday, January 4, 2011

Chunky Beaded Ring Tutorial

My Best Friend gave me the most beautiful handmade beaded ring for Christmas this year. She found it at Smoking Lily, which is one of my favourite places to find unique handmade gifts. Their headquarters are in Victoria BC, but they have a handful of stores scattered around Vancouver and a few other Canadian cities. If you are ever in the neighbourhood you should definitely check them out!

The ring was made by Dancing Leaf Designs and has a mix of vintage beads, pressed glass flowers and leaves, a band of tiny metallic seed beads and a backing of soft leather. This ring design is very comfortable to wear, and for those with metal sensitivities like me, the glass beads of the band won't irritate your skin. I have been wearing it every day and I love it so much that I have been trying to make some more beaded rings of my own. These two are what I have come up with so far:
I thought you might like to give it a try, so I have put together a little tutorial (of course, you can always just head over to Dancing Leaf's Etsy store and buy one instead!).

What you need:
  • A metal bead cap (see photos below) with many small holes, to serve as a base for the ring
  • Monofilament beading line
  • A few large feature beads, with some medium and smaller beads for filler (about 10-20)
  • A little pile of seed beads or very small beads for the ring band
  • A tiny scrap of leather (or you could probably use vinyl or felt)
  • E6000 or other very strong craft glue

 
1. Start by flattening the bead cap with a pair of flat pliers. I think you may be able to buy a special flat perforated metal disc made just for beaded rings like this and if you can find one, use it instead of a flattened bead cap.

2. Cut about a meter of monofilament line. Insert the two ends of the line into 2 small adjacent holes from the underside and begin beading the band from this spot.

3. Choose whatever beading pattern you like and continue until the band is long enough to fit just a little bit loosely around your finger (you want the band a little loose because the fit will be smaller after you add the leather under the ring base).
4. Insert the two ends of the line into two small holes opposite where you started the band (be sure there are no twists in the band). Tie the line using a reef knot on the underside of the metal base. Don't trim the excess monofilament lines.

5. Using one of the long ends, begin adding beads to your ring. Go up through the center hole, add your largest bead, followed by a small seed bead. The line then goes around the seed bead and through the large bead again. Feed the line down through the center hole and pull tight. Continue adding beads, working outwards, filling any gaps. The outermost ring of beads can include overhanging leaf shapes, loops of seed beads or your smaller beads stacked like short kebabs. It's a good idea to try it on occasionally to make sure the design looks balanced on your hand.
 6. When you are happy with your ring, pass the monofilament lines to the underside of the ring and tie together with another reef knot. Trim the ends short. Cut a small circle of leather to fit under the flattened bead cap. Coat the sueded side of the leather with E6000 glue and firmly attach to the inside of your ring. Let the glue set according to directions before wearing.

Tadaa! A sparkly and impressive looking ring you made yourself! Good for you!

    Monday, January 3, 2011

    Little Fabric Scrap Earrings


    Last year I had the opportunity to travel to Taiwan. The country is an amazing place to visit, with beautiful temples, fantastic natural landscapes and some of the nicest people I have ever met. In the shopping districts in Taipei, there are hundreds of cool little shops, many filled with trendy, zakka-style handmade jewellery, bags and clothing. In one of these, I saw some tiny little fabric earrings. They were so simple and cute, I still don't know why I didn't pounce on them immediately. The memory of these little earrings has been nagging at me ever since, and today I decided to go ahead and make some of my own.

    These earrings are a great way to use up little scraps of a favourite fabric you just can't throw away. They work best with tiny prints, or with a really eye-catching solid like an iridescent silk. Of course, if you have a tiny Japanese kawaii print, that would be great too! Along with the fabric, you need a tiny amount of fiberfill or wool roving, a pair of stud earrings, a needle and thread, and some strong craft glue such as E6000. It is best to use earrings that have a "cup" shaped end, instead of a flat surface (see first picture below).

    1. Flip over your fabric scrap and trace a small circle (I used a quarter as my template). Cut out 2 circles of your fabric. In Taipei, they were selling these as mismatched sets, so feel free to use 2 coordinating prints, or simply use different areas of the same fabric so they are not identical twins.

    2. Sew a running stitch around the circumference of your circle (you should use a matching thread, I used red to make the stitching clear in the photos).

    3. Roll up a pea-sized ball of your stuffing, place in the circle of fabric and pull the thread tight to gather into a ball. Make a few stitches across the gathers to hold the little ball tightly closed. Knot your thread and cut off.

    4. Put a tiny amount of E6000 glue on the earring, then carefully attach your fabric ball. Let glue harden overnight before wearing them.


    I was considering giving these away but I think I might have to keep them for myself! I really hope you try making yourself some of these. They take only a few minutes to make and are great little accessories.