
The inspiration for my miniquilt (and the large scale quilt which as of yet lives only in my dreams) comes from this gorgeous modern print I found while perusing Etsy the other day.
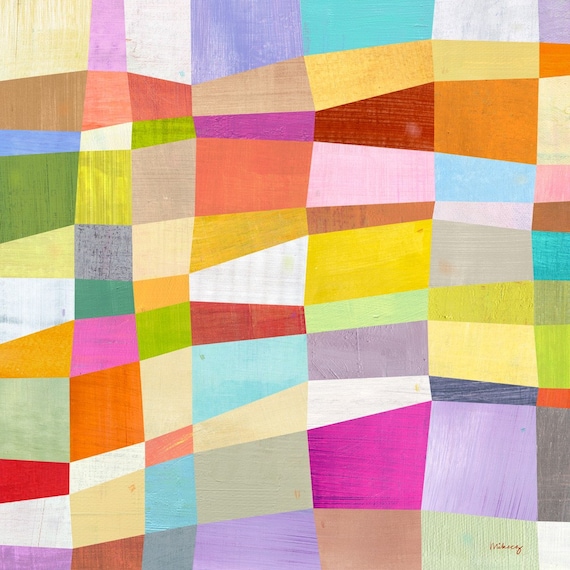
Block Abstract Art Print by Melanie Mikecz of twoems
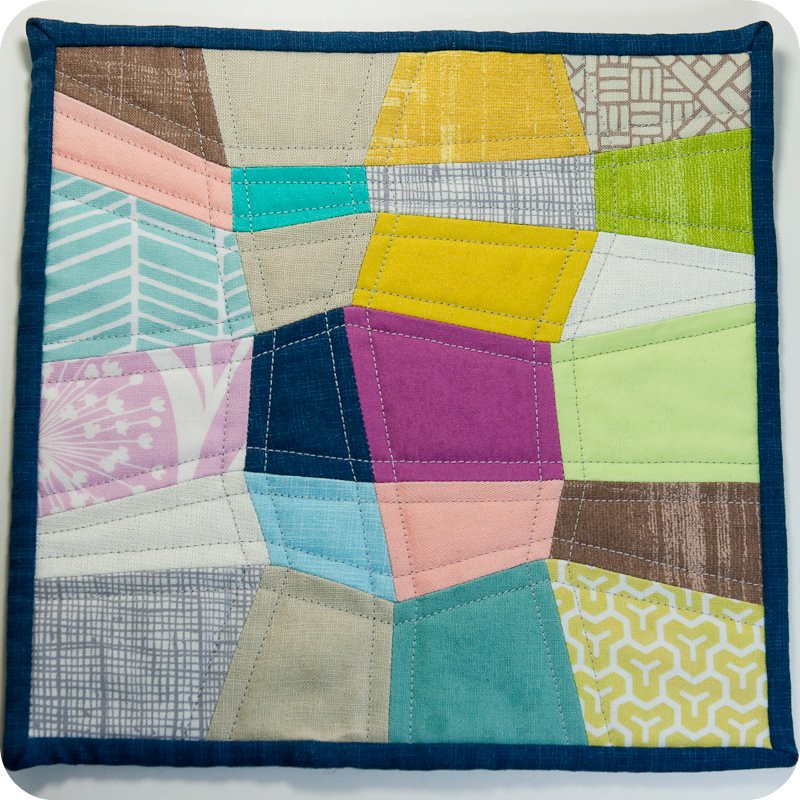
Melanie's palette choice of bright saturated hues combined with neutrals, and the colour blocks in the design reminded me so much of everything I love about modern quilts. In fact, a lot of her prints look like they would make amazing modern quilt projects. They are so inspiring, you should really go take a peek. At first glance, I thought that I could achieve this look with improvisational piecing, but then I noticed that each quadrilateral colour block intersects at a single point and I would need to make a pattern. I also realized that sewing the rows of blocks together would require use of the dreaded Y-seam, which is why I tried a tiny version of this before committing to a huge quilt.

The solids were a combination of natural and white linens, Laura Gunn's Magnolia Lane, Robert Kaufman's Quilters Linen and Pat Bravo's Pure Elements. The prints were from Alexander Henry, Joel Dewberry and Kate Spain. I also used a medium weight turquoise woven, and a lighter weight peach cotton sateen from my stash of fashion fabric.
For my pattern, I measured an 8" square onto the papery side of some freezer paper and added a 1/4" seam allowance around all 4 sides of the large square. Then I took a little ruler and started making 4 sided shapes with intersecting points to fill the square. You really can't go wrong here, but I tried to vary the width of the rows as well as the angles of each shape. Basically, the wonkier your quadrilateral shapes, the better. Number all the pieces, with your numbers facing the same way up so that you will be able to fit it all together again (underline your 6's and 9's!!). After I had carefully cut them all apart, I came up with the idea of drawing some horizontal lines on the pattern to indicate the direction of grain, so you might want to try that too. I just aligned the pattern pieces on the fabric grain as best as I could guess.
I wanted to ensure an element of randomness, so that the colour placement didn't get too fussy and predictable. To achieve this, after I cut out all the shapes, I put them in the randomizer (or "bowl" as some people call it) and then sat at my ironing board, with my stack of fabrics, choosing a piece at random from the bowl and ironing it to the wrong side of whatever fabric came next in the stack. When I had run out of fabrics in my original stack, I picked out all the neutrals and made a new stack, and repeated the process until I had ran out of pattern pieces. This is a variation on the theme of the Paper Bag method devised by the queen of improvisational quilting, Denyse Schmidt. Of course, as supreme ruler of your own quilting universe, you have the power to veto anything the randomizer chooses that you really dislike.
 After ironing the pattern pieces to my fabric I trimmed each piece to include a 1/4" seam allowance around all sides (except where the edge seam allowance was already included) with my rotary cutter. Being really careful in this step makes everything easier to line up later. I left the paper patterns on for the whole sewing process to help make sure I was sewing accurately and then ripped them out gently at the end. How you choose to sew your Y-seams will affect how you proceed to the next step. There are a lot of schools of thought on this, and lots of online tutorials and videos to help you out; this was my first time trying to sew a Y-seam with my machine so if you know a better way, go with your gut.
I chose to align each pair and chain piece them, sewing the seam through each seam allowance. I used my 1/4" foot to make piecing faster and more accurate. When aligning the pieces, I poked a pin through the fabric at each corner to be sure that they were lined up properly. It is trickier to get these right than you would assume due to all the funky angles so I checked each one individually to be sure. (I forgot to take a picture of this, so in the photo below, they are already sewn together). Press open the seams and then attach all the pairs to make complete rows. Press again, although not too enthusiastically, you don't want to steam them or distort them too much.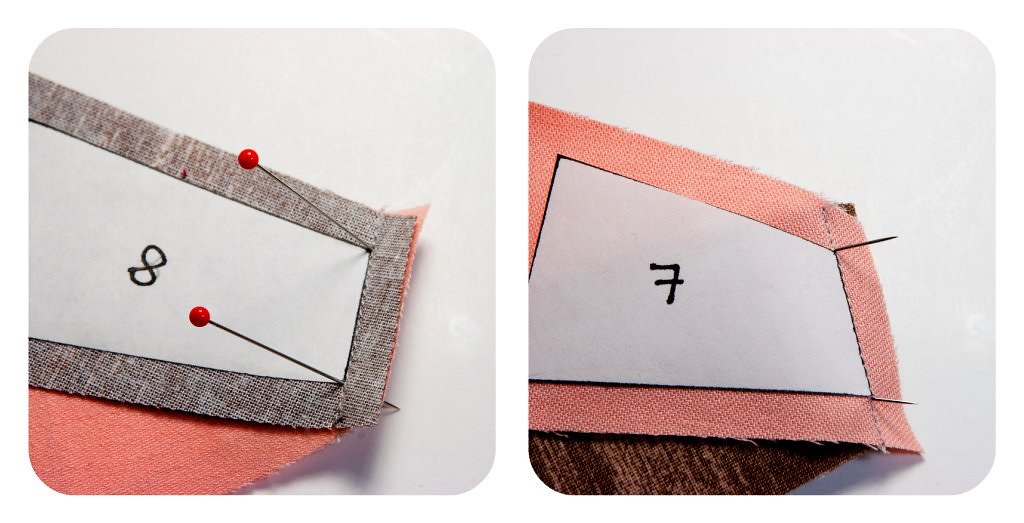 I tried unsuccessfully to get a picture of how I sewed my Y-seams together. Please accept my apologies and watch this helpful video from videojug instead. Sew each matching side together, stopping at the center of each seam, then rotate the top row to line up the next pair of matching sides and sew again. Repeat this process of matching up seams and rotating the row until you reach the end. Again, it is helpful to poke a pin through the seam to check that it comes out at the same point on the other piece. I rotated the top row with the sewing machine needle down in the center seam, and I found that the fabric aligned smoothly.
I tried unsuccessfully to get a picture of how I sewed my Y-seams together. Please accept my apologies and watch this helpful video from videojug instead. Sew each matching side together, stopping at the center of each seam, then rotate the top row to line up the next pair of matching sides and sew again. Repeat this process of matching up seams and rotating the row until you reach the end. Again, it is helpful to poke a pin through the seam to check that it comes out at the same point on the other piece. I rotated the top row with the sewing machine needle down in the center seam, and I found that the fabric aligned smoothly.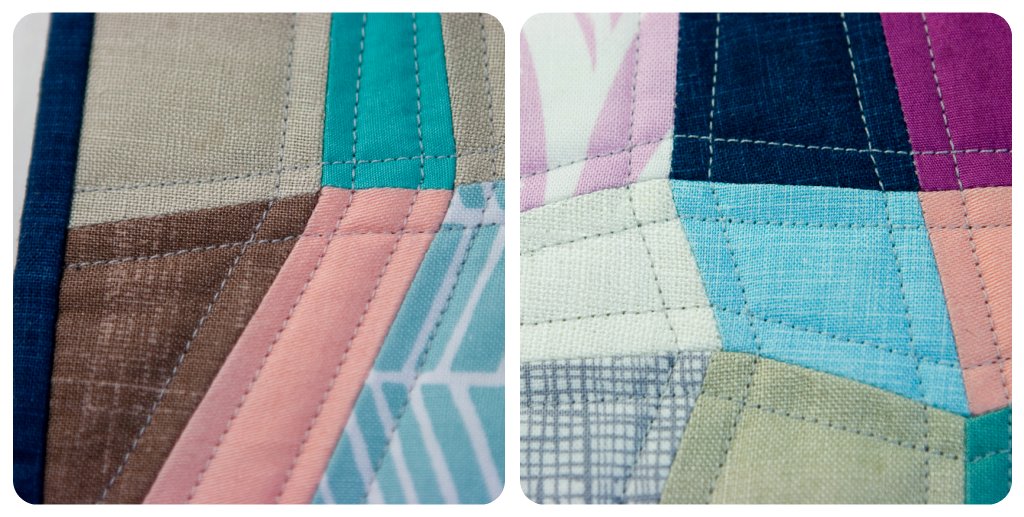
Look how neatly some of my points line up! A few seams were off by a millimeter or so, but the finished block lies flat and with no waves or wrinkles so I was pretty happy with my first attempt at sewing Y-seams on my machine. I backed my mini-quilt with the beige linen, and used the dark blue quilters linen for the binding. I had a tough time deciding how to quilt this, but eventually went with a light grey thread and my walking foot to make parallel lines of stitching along all the seams. I think it accentuates the geometric pattern perfectly.

And now the obligatory pretty mug rug shot with my cute little cupcake mug from Momiji. I love my little mug, my mom got it for me for my birthday years ago and it always makes me smile when I use it.
So the goal now is to try to translate this project into a full size quilt (or maybe a lap quilt?). Making the full size pattern might be challenging, but I think it is still doable. I am not sure how I would quilt a larger version. I like my quilting pretty dense, so maybe alternating directions of close parallel lines in each block, or even an angular spiral within some of the blocks will accentuate the overall design.
Did any of you make mug rugs for Mug Rug Madness? I would love to hear about your inspiration. I hope some of you try making a cute little quadrilateral quilt like this, it was a great way to practice a tricky skill, and it makes a really modern and spectacular looking block.
It's beautiful! Thank you so much for sharing!
ReplyDeleteWOW! Gorgeous! I will absolutely try this one day! And I'm looking forward to seeing your big quilt! I'm loving the Mug Rug Madness. I've never made one before either. ..and I am making one right now :) it's a little 'tea' mug rug from Nova's tutorial.
ReplyDeleteThis looks great. Well done.
ReplyDeleteI'm in the middle of machine piecing some 4" hexagons. The piece also has hand paper-pieced 1" hexagons, so I had originally intended to hand piece the larger ones, too, using freezer paper templates. I found the freezer paper to be a huge bother when machine piecing, especially when turning the corners. I ended up trimming the seam allowances down to precise 1/4" and removing the paper.
Do you think you'll leave the paper on when you make the larger project?
Good question Dan, I'm not sure if I would leave them in or take them out. In this mini quilt, some of the blocks were less than an inch wide, so I felt that I needed a really high level of accuracy with my piecing in order to pull it off, which is why I left the paper in. With very large pieces, this might not be an issue, as you can always fudge your seam placement by a few mm when you have more fabric to play with. I did notice that the freezer paper stabilized the loosely woven linens beautifully though, so for those blocks, it might have helped me a lot!
ReplyDeleteYour comments about the 'randomizer' made me laugh. Love that power to veto.
ReplyDeleteI am also working on Y seams (machine-pieced hexagons) and I completely know the feeling of seeing seams perfectly lined up. Yours look lovely!
i love seeing the source of your inspiration as i too enjoy this process...you've translated that print into cloth just beautifully
ReplyDeleteThank you! Thank you! Thank you! I've had her artwork on my pinterest quilts inspiration board for quite a while. I keep looking at it and wondering how to piece it, and you've gone and done all the figuring out for me! Yay!
ReplyDeleteLove your mug rug! It's a great way to try ideas out. I went digging through my leftovers from other quilt projects,matched like colors up and... Voila! My rugs were already half made!
ReplyDeleteGreat to read the whole process, and see the lovely end result.
ReplyDeleteI love how this turned out, thanks for sharing your process!
ReplyDeleteThat is one sexy mug rug. My mug would be living right on the edge too, so it doesn't block the view. Thanks for the tute!
ReplyDeleteBeautiful, beautiful work! I've never sewn Y-seams, so I watched the video. She describes removing 2 stitches on the original pieced seams before joining the y-seam piece. So, did you do that? Did you remove stitches on your rows before joining them together? I'm very inspired!
ReplyDeleteWhat an inspiration! So glad you shared the how-to. And congrats on being featured by Modern Day Quilter.
ReplyDeleteHey I love the greeny yellow print if you have any of that fabric you could spare ... let me know it would be great for my pillow project.
ReplyDeleteHey pro-craft-inator! I'm really sorry but I am saving all these prints for the bigger version of this project... Are you talking about the Joel Dewberry Honeycomb or the Laura Gunn Painterly solids? I think both are pretty easy to track down if you are really in love :)
ReplyDeleteI am just starting my first scrappy mug rug swap on flickr - I love this idea! I haven't tried piecing anything together, but I love what you've done with it!
ReplyDeleteThat's really lovely! But painstaking in the process. Can you improv something similar?
ReplyDeleteHi Sherri! I think you could improv something similar, but it wouldn't have the same qualities as my print inspiration. To make a simplified version, maybe you could wonky strip piece some fabrics, then slice the strips into alternating angles and sew them together to get an angular grid. For me, I really like the "puzzle-piece" look with all the points matching up, and sadly there wasn't an improv method to make that happen.
ReplyDeleteThis is so lovely! I did a very similar style with improv. piecing using a crease and sew technique that I shared in this post http://jennabrand.com/2013/03/29/trapezoids-at-work-quilt-top-and-tutorial/
DeleteIt's a bit of an adventure, but it worked for me!
Cute! I am here from Giveaway day, but will be sticking around :-)
ReplyDeleteCheers!
Kristie from OCD...over in Winnipeg ;)
this is super cool! i love your style. :)
ReplyDeleteI'm new to your blog but already love what you're doing with quilts. Did you learn from a book or online resource, or did you get hands-on instruction? I'd love to start making abstract things like this, but I need a starting point.
ReplyDeleteHappy Thanksgiving!
Hi Flynn,
ReplyDeleteI have learned a lot of online tutorials, there are some amazing quilt bloggers out there. I suggest just jumping in and trying stuff yourself. My first few projects were really big, if I was starting from scratch again, I would try to choose a small project, like a dolls quilt, or something without any bias cut pieces. Thankfully, there are tons of great beginner quilt patterns and inspirations that still look really stunning and modern.
Good Luck
We just discovered your blog and tutorial and this is wonderful! Very creative and useful. We've pinned it to our favorites at Pinterest. :)
ReplyDeleteThis looks fantastic. I just found twoems a couple of weeks ago and like you I've pinned them to try and make a quilt from later. Probably much later : )
ReplyDeleteHi very nice blog!! Man .. Beautiful .. Wonderful ..I’ll bookmark your web site and take the feeds also. I am glad to search out so many useful information here in the post, thank you for sharing. Feel free to visit my website; 카지노사이트링크
ReplyDeleteWhat a Excellent post. I hope to contribute & assist different customers like its aided me. 바둑이사이트넷
ReplyDeleteI read your post well. It's full of very interesting stories.It's great how you can think of that.
ReplyDeleteFound most people will go along with your views on this web site.
ReplyDeleteIt looks great. I have bookmarked it in my google bookmarks to come back then.
ReplyDeleteIt’s in point of fact a nice and helpful piece of information.
ReplyDelete
ReplyDeleteThis post is good enough to make somebody understand this amazing article
That was really a great article.
ReplyDeleteEnjoyed reading the article above, really explains everything in detail.
ReplyDeleteThis article is very interesting and effective.
ReplyDeleteThank you and good luck in the upcoming articles.
ReplyDeleteGreat blog site. Keep up the good work!
ReplyDelete
ReplyDeleteIt was a great show , really enjoyed it
Keep up the good writing. please visit our beautiful website, spread the love, thankyou
ReplyDeleteTHANKS FOR GIVING EVERYONE A REMARKABLY MEMORABLE POST THAT YOU’VE SHARED TO US.
ReplyDelete
ReplyDeleteWhat a nice information, great article.
ReplyDeleteReally appreciate you sharing this blog Much thanks again. Want more.